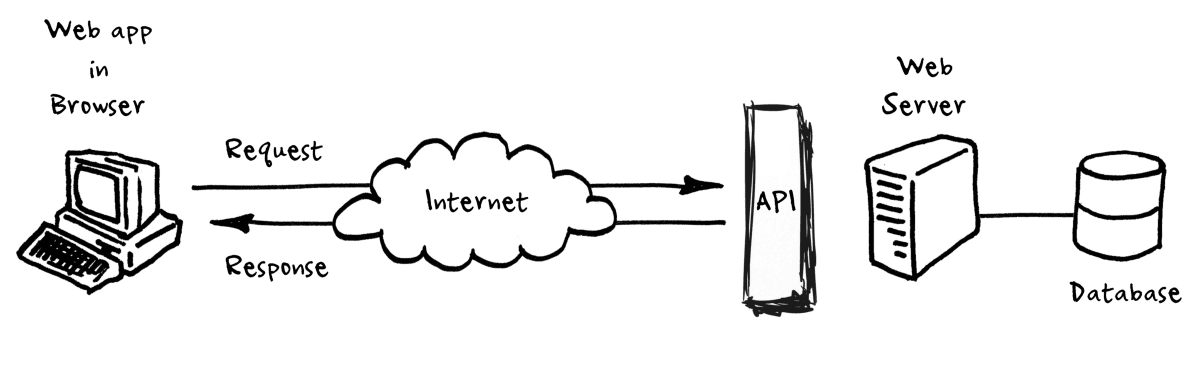
Saturday, March 14, 2020

API Testing

What is API?
An Application Programming Interface (API) acts as a conduit for communication and the exchange of data among different software systems. Systems equipped with APIs contain functions and sub-routines accessible for execution by other software systems.
https://lh6.googleusercontent.com/_nYCLkTG8PO_Wx5-jkdIq3Wyo1PBGrh4wiincNkb5cnZijpxfzCclyxMJbNwYItS8T3Iao-Cqm5WphPy4d4Mlihszki6MBiqZA7NBwTnuFxU49ppZEZyv8v0QEEVAA9Ai3buwhG7


What is API Testing?
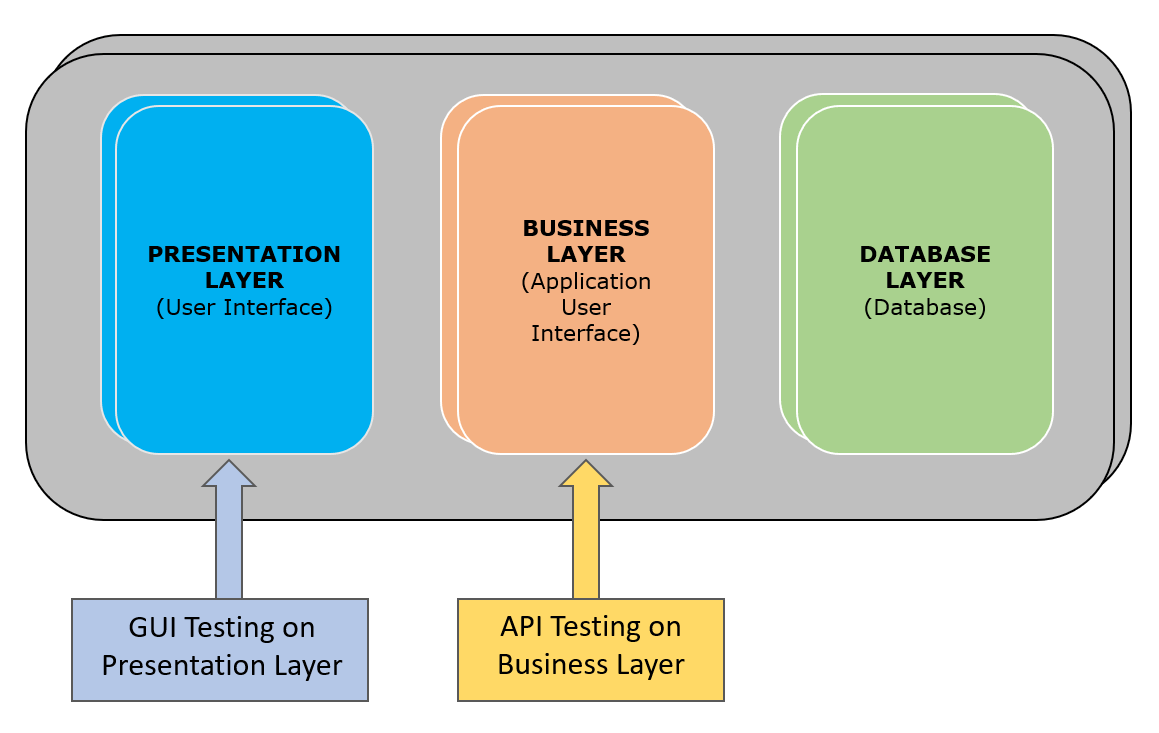
API testing involves evaluating the robustness of Application Programming Interfaces (APIs) through various tests. Its main objective is to ensure the functionality, dependability, efficiency, and security of these interfaces. Unlike traditional testing methods involving user inputs via keyboards and graphical user interfaces (GUIs), API testing relies on software to interact with the API, gather responses, and monitor system actions. API tests differ from GUI tests in that they prioritize examining the business logic layer of the software architecture rather than its visual elements.

Image result for What is API Testing?
For API testing, you require an application accessible via an API. When conducting API testing, you can choose between two approaches:

Use a testing tool to interface with the API.
Develop your own code to execute API testing.


Test Cases for API Testing:
API testing test cases are grouped according to specific criteria:

  1. Return value based on input conditions: This involves verifying the outcome when input is provided, allowing for relatively straightforward result validation.
  2. No return value: In scenarios where an API does not yield a return value, it's essential to examine its behavior within the system.
  3. Triggering other API events or interrupts: If an API's output triggers additional events or interrupts, it's critical to monitor and validate these occurrences along with their corresponding listeners.
  4. Updating data structures: When an API call modifies a data structure, it can significantly affect the system, necessitating confirmation of these changes.
  5. Modifying specific resources: APIs responsible for altering system resources must undergo thorough validation by accessing and examining the pertinent resources.

Approach of API Testing:

Users can effectively approach API testing by adhering to the following guidelines:

  1. Comprehensive Understanding: Gain a thorough comprehension of the API's functionality and clearly define the program's scope before initiating testing.
  2. Testing Methods: Utilize testing techniques such as equivalence classes, boundary value analysis, and error guessing to construct well-defined API test cases.
  3. Thoughtful Input Parameters: Ensure that input parameters for the API are meticulously planned and accurately defined to enhance the quality of testing.
  4. Test Execution and Comparison: Execute the formulated test cases and meticulously compare the anticipated outcomes with the actual results to identify any disparities or anomalies.

Best Practices of API Testing:
Here are some recommendations for organizing and conducting API testing:
  1. Categorize Test Cases: Group test cases into distinct categories to streamline the testing process.
  2. Clearly State Invoked APIs: Begin each test case by clearly identifying the APIs being utilized.
  3. Specify Parameters: Explicitly define the parameters chosen for each test case within the test itself for clarity.
  4. Prioritize API Calls: Arrange API function calls in a prioritized manner to simplify testing and ensure critical functions are tested first.
  5. Self-Contained Test Cases: Aim to make each test case self-contained and independent of external dependencies to maintain reliability.
  6. Avoid Test Chaining: Refrain from the practice of "test chaining" during development to prevent unintended dependencies between test cases.
  7. Exercise Caution with One-Time Call Functions: Be especially cautious when dealing with one-time call functions like "Delete" or "CloseWindow" to prevent unintended consequences.
  8. Meticulously Plan Call Sequences: Plan and execute call sequences meticulously to ensure thorough testing coverage.
  9. Comprehensive Test Coverage: Create test cases that cover all possible input combinations for the API to achieve comprehensive test coverage and uncover potential issues.

The Benefits of API Testing

Earlier Testing:
In API testing, once the logic is defined, tests can be created to validate response accuracy and data integrity. Unlike traditional testing methods that may require waiting for multiple teams' tasks to complete or entire applications to be developed, API test cases can be created independently and are readily available for immediate use.

Easier Test Maintenance:
User interfaces (UIs) often undergo frequent changes due to factors like web browser updates, device variations, and screen orientation adjustments. This constant evolution can result in the need for frequent revisions to test scripts to align with the changing UI. In contrast, API changes are typically more controlled and occur less frequently. Additionally, API definition files like OpenAPI Spec can streamline the process of test maintenance, requiring minimal effort and time for updates.

Faster Time To Resolution:
When API tests fail, they provide precise insights into the location and nature of the issue, minimizing the time needed to identify and resolve defects. This focused approach accelerates the Mean Time To Recovery (MTTR), a critical performance indicator for DevOps teams, as it reduces the time spent troubleshooting across different builds, integrations, and team members.

Speed and Coverage of Testing:
Running a large number of UI tests can be time-consuming, often taking hours to complete. In contrast, executing API tests is significantly faster, allowing for the completion of a comparable number of tests in a fraction of the time. This speed advantage enables quicker bug identification and resolution, ultimately improving the efficiency of the testing process.

Synchronization in Selenium

Synchronization:

Synchronization is a mechanism which involves two or more components working parallel with each other. Usually, in test automation, there will be two components such as application under test and the test automation tool. Both of them will have specified speeds and the test scripts should be written in a way such that both these components will work with same speed. This will help to avoid “Element Not Found” error which otherwise will consume more time to clear off. Here the synchronization will come for the help.


Generally, there are two different categories of synchronization in test automation.
  1. Unconditional Synchronization
  2. Conditional Synchronization
1.) Unconditional Synchronization:


In this case, only the timeout value to be specified. The tool will wait till certain time before proceeding.

Examples: Wait(), Thread.Sleep()

The main advantage of this method is that it will come for help when we interact with a third party system such as an interface. Here, it is not possible to write condition or check for a condition. In such cases, the application can be made to wait for a specific period using this type of synchronization. The major disadvantage is that at some times, the tool will be made to wait unnecessarily even when the application is ready.

2.) Conditional Synchronization:
In this case, a condition also will be specified along with the timeout value. The tool will wait to check the condition and will come out if nothing happens. However, it is important to set a timeout value also in conditional synchronization so that the tool will proceed even if the condition is not met. There two different types of conditional statements in selenium webdriver and they are an implicit wait and explicit wait.

Implicit Wait:
The implicit wait will tell to the web driver to wait for certain amount of time before it throws a "No Such Element Exception". The default setting is 0. Once we set the time, web driver will wait for that time before throwing an exception.
Syntax:
driver.manage().timeouts().implicitlyWait(TimeOut, TimeUnit.SECONDS);

Example for Implicit Wait
WebDriver driver = new FirefoxDiriver();
driver.manage().timeouts().implicitlyWait(10, TimeUnit.SECONDS);
driver.get();

Implicit wait will accept 2 parameters, the first parameter will accept the time as an integer value and the second parameter will accept the time measurement in terms of SECONDS, MINUTES, MILLISECOND, MICROSECONDS, NANOSECONDS, DAYS, HOURS, etc.

Explicit Wait:

Here a condition will be specified for a wait statement along with a specified time limit. The condition should be met within the specified time limit. The testing will start proceeding when the condition is not met within the specified period of time.

The explicit wait is used to tell the Web Driver to wait for certain conditions (Expected Conditions) or the maximum time exceeded before throwing an "ElementNotVisibleException" exception.

The explicit wait is an intelligent kind of wait, but it can be applied only for specified elements. Explicit wait gives better options than that of an implicit wait as it will wait for dynamically loaded Ajax elements.

Once we declare explicit wait we have to use "ExpectedCondtions" or we can configure how frequently we want to check the condition using Fluent Wait. These days while implementing we are using Thread.Sleep() generally it is not recommended to use.

Example for Explicit Wait


/*Explicit wait for state dropdown field*/
WebDriverWait wait = new WebDriverWait(driver, 10);
wait.until(ExpectedConditions.visibilityOfElementLocated(By.id(“statedropdown”)));

Fluent Wait:
This is used when a maximum amount of time to be allowed for a condition to met and also when the frequency of checking conditions is more.
Syntax:


Wait wait = new FluentWait(WebDriver reference)
.withTimeout(timeout, SECONDS)
.pollingEvery(timeout, SECONDS)
.ignoring(Exception.class);


Assertion In Selenium Using Nunit

Assertion:
Assertion in Selenium is used for asserting the given input value with the content or value available on the web-page. If the given value with the value on the web-page matches then we will return the true value otherwise we will return false.

If an assertion fails, the method call does not return and an error is reported. If a test contains multiple assertions, any that follow the one that failed will not be executed. For this reason, it's usually best to try for one assertion per test.

Each method may be called without a message, with a simple text message or with a message and arguments. In the last case the message is formatted using the provided text and arguments.

Two Models
Before NUnit 2.4, a separate method of the Assert class was used for each different assertion. We call this the classic model. It continues to be supported in NUnit, since many people prefer it.

Beginning with NUnit 2.4, a new constraint-based model is being introduced. This approach uses a single method of the Assert class for all assertions, passing a constraint object that specifies the test to be performed.

This constraint-based model is now used internally by NUnit for all assertions. The methods of the classic approach have been re-implemented on top of this new model.

Classic Assert Model
The classic Assert model uses a separate method to express each individual assertion of which it is capable.
example:  StringAssert.AreEqualIgnoringCase( "Hello", myString );

The Assert class provides the most commonly used assertions. For convenience of presentation, we group Assert methods as follows:


Beyond the basic facilities of Assert, additional assertions are provided by the following classes:
Constraint-Based Assert Model 
The constraint-based Assert model uses a single method of the Assert class for all assertions. The logic necessary to carry out each assertion is embedded in the constraint object passed as the second parameter to that method.
Using this model, all assertions are made using one of the forms of the Assert.That() method, which has a number of overloads. 
Use below link For Type of Constraint-Based Assert Model


Featured Posts